In The Merde, France 1940
by Paul Martin, June 2007
Introduction
France, June 1940, and all along the front B.E.F and French forces are staging rearguard actions in an attempt to buy the Dunkirk evacuation a few extra minutes.
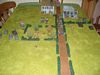
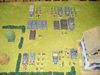
One such ‘possible’ action happened around the little known commune of La Belle Vue North of Wormhout. As the name suggests, Belle Vue is a picture-postcard village bordered by a small river. A volunteer force of French Light Infantry and two light tanks supported by a weakened British Rifle company devoid of all transport less a single Bren Carrier, is all that stands between the beaches and advance elements of a Wehrmacht Motorised Infantry Brigade and its attached Panzer Battalion.
Allied Battlegroup
| |
French CO |
| |
|
6 x Infantry Units |
| |
|
1 x Support Unit (MG) |
| |
|
1 x Support Unit (Mortar) |
| |
|
1 x Tank Unit (Hotchkiss H-35) |
| |
French HQ |
| |
|
6 x Infantry Units |
| |
|
1 x Support Unit (MG) |
| |
|
1 x Tank Unit (Somua S-35) |
| |
British HQ |
| |
|
6 x Infantry Units |
| |
|
1 x Support Unit (MG) |
| |
|
1 x Support Unit (Mortar) |
| |
|
1 x Transport Unit (Bren Carrier) |
| |
British FAO |
| |
|
1 x Artillery Unit (25pdr) |
German Battlegroup
| |
CO |
| |
|
7 x Infantry Units |
| |
|
1 x Support Unit (MG) |
| |
|
1 x Support Unit (AA, Quad 20mm on Half-Track) |
| |
|
1 x Tank Unit (Pz-II) |
| |
|
1 x Tank Unit (Pz-IV Short) |
| |
|
2 x Transport Units (Truck) |
| |
HQ |
| |
|
1 x Recce Unit (Motorcycles) |
| |
|
1 x Recce Unit (Sdkfz 250/10) |
| |
|
4 x Infantry Units |
| |
HQ (Support Platoon) |
| |
|
1 x Support Unit (IG, sIG-33) |
| |
|
2 x Support Units (Mortar) |
| |
|
1 x Support Unit (MG) |
| |
|
1 x Infantry Unit |
| |
FAC |
| |
|
1 x Aircraft Unit (Stuka) |
| |
FAO |
| |
|
2 x Artillery Units (105mm) |
Battle Plan – Allies
The British Command, expecting to bear the brunt of the onslaught, took up positions in the orchard and dug in deep. The FAO sat back at the main T Junction whilst the 25pdr hugged the baseline in the woods close enough to the edge to be wheeled forward into a direct fire anti-tank weapon as a last resort.
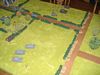
The French commands took up positions either side of the T Junction to cover any sweeping advances on the flanks.
Battle Plan – Wehrmacht
Under cover of a six turn pre-planned artillery mission supplemented by a solitary Stuka’s ground attack missions, the plan was to probe the enemy defences ahead of the two flank assaults either side of the village.
The orchard, an obvious defensive thorn was to be subject of the most ferocious artillery efforts followed by a smoke carpet being laid on the T-Junction to cover the main assaults.
The support platoon was to provide covering fire to the main armoured assault as it bypassed any resistance in its mission to secure the main road junction.
The Stuka would soften up the Junction in advance of the armoured thrust.
Turn 1
The pre-scheduled artillery barrage on the orchard landed with limited effect suppressing only one of the defending infantry stands. Despite a successful reconnaissance sweep identifying enemy infantry lying in ambush, the resulting artillery request of the support platoons IG 150mm failed to do any further damage.
The reconnaissance platoon swept onto the battlefield, however further attempts to move the remaining German commands into the fray failed.
The British command, their position rumbled focussed their fire on the Motorcycle Platoon but to no avail.
Turn 2 & 3
Further scheduled artillery fire continued to pound the British positions keeping the vast majority of the defenders heads down whilst one or two units panicked and began to withdraw from their positions. The recce platoons advance continued allowing the infantry and their Pak37 to close the distance by taking up positions in the hedgerows flanking the road.
The German support platoon managed to take up positions in and around the houses to support the assault on the orchard, whilst the armoured command rattled across the canal bridge. The German CO cautiously crept forward around the left flank out of view of the orchard.
Desultory fire from the British positions in the orchard suppressed a single infantry unit, the FAO (probably fast asleep or away ‘brewin up’ failed to respond to the enemy movement on the road and again the 25pdr remained ominously silent.
The French CO coaxed a short response to the German Recce platoons movement through limited mortar support.
Turn 4
The German CO, realising that his artillery support was about to switch targets ordered his FAO to check the Battery’s Fire – a command that met with success. The first of the Stuka’s Ground Attacks came in seeing the first Allied casualties – the HMG from the French CO’s command.
A massive volume of fire was poured into the orchard suppressing almost the entire line of opposition and allowing both flanks to rattle forward almost unopposed. The supporting infantry of the armoured command leapt form their transport in full view of the British position who were unable to return anything but the odd round in anger.
The British FAO returned from his brew but in his haste directed his fire onto the orchard… thankfully without effect!
Allied Breakpoint 1/10, German Breakpoint 0/15
Turn 5
A second attempt to stall scheduled artillery support failed and even added to a further ground attack by the Stuka, only limited amount of damage was done on the defenders of the T-Junction.
The German Recce Platoon, Support Platoon and the Pz35(t)’s of the armoured thrust rained fire and fury down on the orchard. Those units not suppressed by the devastating weight of fire were deployed too far back in the trees to see the advance of the supporting German infantry until the enemy was on top of them.
Furious exchanges of fire resulted in casualties to both sides, but the British commander could see the writing on the wall being now almost totally surrounded.
The French commands, too distant to support their allies could only wait their turn to enter the fray.
Once again the British FAO failed to establish contact with his battery.
Allied Breakpoint 2/10, German Breakpoint 2/15
Turns 6 & 7
Further pre-planned artillery fire this time smoke missions fell all around the crossroads. Even if the French CO wanted to support his beleaguered allies he could not.
The skirmish in the orchard continued to rattle on as the German Commander threw more and more infantry into the fray. Despite a staunch British defence the cracks were beginning to show as casualties and withdrawals continued to mount.
Meanwhile in true Blitzkrieg fashion, the flank assaults of the supporting armour bypassed the point of resistance eager top close on the crossroads. The Hotchkiss H35 of the French CO’s command managed to draw a bead on the German CO’s armour, but its paltry effort glanced off the lead tanks armour. Even the French mortar which kept having some success was rendered useless due to the smoke barrage.
Allied Breakpoint 4/10, German Breakpoint 3/15
Turn 8
With all his pre-planned artillery missions spent the German FAO called in another fire mission on the crossroads which thankfully for the allies failed. The German FAC called in a further ground attack strike on the Somua S35, and again communications failed. Was the tide about to turn for the Allies?
Definitely not! Now outnumbered by almost three to one, the British defence of the orchard was on its knees. Even with a limited return of fire from the few remaining infantry left, the British commander was left with little option left but to offer his surrender before his entire command was wiped out to a man.
The armoured assault continued its progress on both flanks knocking out the Hotchkiss at the first attempt. The Pz35’s facing a slightly tougher opponent in the Somua lost one of their number to the French tank crew before amassing several consecutive hits resulting in the Somua’s destruction.
The French CO, now finding his command 2 above its breakpoint and with no remaining anti-tank capability, decided to withdraw into the woods. Frustratingly his own forces were practically unscathed less the armoured support. The British defence of the Orchards had bought him time to withdraw safely although the road to Dunkirk was now wide open.
Allied Breakpoint 12/10, German Breakpoint 4/15