The Battle for Hannover, West Germany, 1976
Following on from the article in Wargames Journal Issue 5, this is a hypothetical battle between NATO and the Warsaw Pact set in West Germany, 1976. You will need to read the full article to know the background to the battle and the forces involved. The only thing I will reveal is that the scenario is a Soviet Breakthrough Attack by three Regiments of the 10th Guards Tank Division against elements of the British 7th Armoured Brigade on the morning of Sunday 6th June 1976.
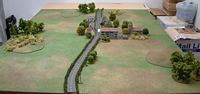
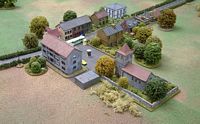
The Battlefield
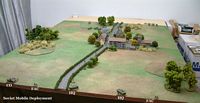
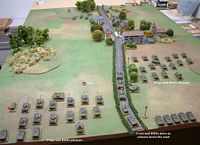
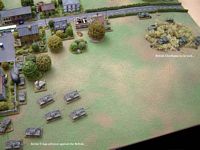
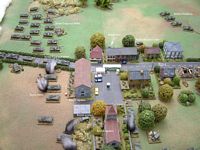
The battlefield has the B214 running down the length of the table, with the British being deployed up to the half-way mark and the Soviets entering the opposite table edge using mobile deployment. The game is played down the length of the table, rather than across the width. There is a hamlet along the main road. The surrounding area is composed of open fields, interspersed with gentle hills and sparse woodland.
Before The Battle
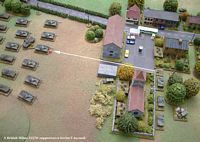
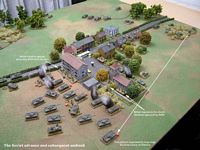
Both sides rolled for air superiority, with the British gaining the upper hand: they had partial air superiority for the duration of the battle. The British player then elected the block of flats as the location for the ambush and left three infantry units off-table in his reserve pool. The Soviet player determined his four scheduled air strikes as follows:
- Turn 2, woods on the left flank
- Turn 2, church
- Turn 3, furthest house, left of road
- Turn 3, furthest house, right of road
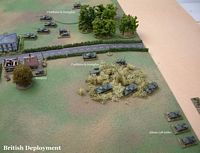
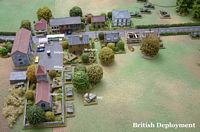
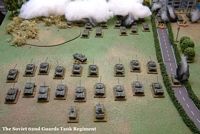
Deployment
The British player deployed first, up to the centre of the table. The Soviet player used mobile deployment, placing his command units in their desired locations at the edge of the table. One of the Soviet tank regiments was left off-table, to be ordered on during a subsequent turn (primarily due to lack of room as there are a lot of units in this battle!).
Soviet Turn 1
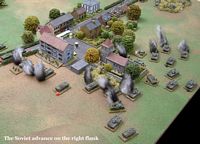
The Soviets begin the advance, making good progress on the right flank towards the church. The T-10s advancing down the road come under fire from the Chieftain troop just under 2km away and the lead platoon is suppressed. The T-10s and BMPs continue to advance past the suppressed platoon. On the left flank, the T-64s and BMPs under the command of the CO advance onto the table, with one of the T-64s coming under fire from a Chieftain troop, to little effect.
British Turn 1
The Milan ATGW opens fire at one T-64 platoon, suppressing it. The Abbots fire HE at the Soviet left flank, suppressing the BRDM unit and managing to get three hits on the Soviet CO, but two of these were saved!
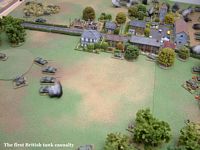
Casualties
The Soviets are 0/28 away from their breakpoint, the British are 0/13 away from theirs.
Soviet Turn 2
The turn begins with the SU-17 air strikes against the church on the right flank and the woods on the left flank. The SU-17 flight over the church is hit by Blowpipe missiles, but only suffers one hit and continues with the attack. One FV.438 is knocked-out, another is suppressed, as is the Milan unit. The SU-17 flight against the woods suppresses two of the three British infantry platoons.
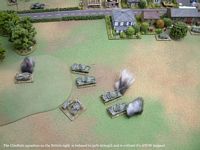
The Soviets on the right advance towards the flats and trigger an ambush that leaves one BMP platoon and it's occupants knocked-out, with another platoon suppressed. Another BMP company advances towards the church and comes under fire from Carl Gustavs: one BMP platoon and occupants is knocked-out, another is hit, but is OK.
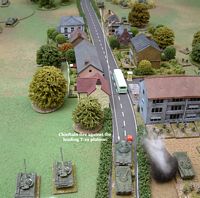
The T-10s and BMPs continue to advance slowly up the B214, with the lead T-10 platoon taking six hits from a Chieftain troop, but saves five of them! The following platoon of T-10s also comes under fire and becomes suppressed. The BRDM Spandrel unit fires against a Chiftain troop, suppressing it. The British respond with their Swingfire unit on the high ground and knock-out the Spandrel unit.
British Turn 2
During the initiative phase, the regulars in the flats knock-out a further BMP platoon and suppress a second one with their Carl Gustavs. The regulars in the church do a similar thing to the BMPs facing them: one is KO'd, another suppressed and it's occupants dismount.
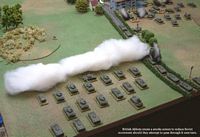
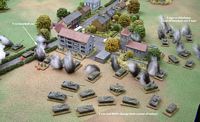
With some shrewed thinking, the British Abbots drop a barrage of smoke infront of the T-64s in the open ground in order to hinder their advance next turn. This proves to be a very useful tactic as you will see.
The Chieftains on the British right flank hit the T-10s and lead T-64s, suppressing one platoon of T-64s. The Swingfire on the high ground hits the forward T-10 platoon, then three of the four Chieftain troops fire on the move against the same T-10 platoon, finally managing to suppress it. The British CO then rolls a command blunder and suffers a -1 to his command value next turn!
Casualties
The Soviets are 8/28 away from their breakpoint, the British are 1/13 away from theirs.
Soviet Turn 3
The SU-17s return to the battlefield for their second and final scheduled strike. The SU-17s on the left hit the end of the built-up area to the left of the road, to no effect. Those on the right hit the end of the built-up area to the right of the road and abort the attack due to intense AA/SAM fire.
Two T-64 platoons engage the British regulars in the flats, suppressing one platoon. The rest of the T-64 battalion advances round the church and into the open fields beyond, attempting to close the range with the Chieftains before the latter can do any damage. Two T-64 platoons are suppressed by opportunity fire from the Chieftains, whilst one T-64 platoon is suppressed from Carl Gustav fire from the church. The Soviet HQ running the show on the right flank then blunders and three units are caught in cross-fire: one infantry platoon routs as it is already suppressed, a BMP platoon is forced to fall-back and the ZSU unit is knocked-out!
In the centre, the lead T-10 platoon comes under opp fire from the Chieftain down the road, to no effect. Further opp fire hits the following T-10 platoon and two BMP platoons, to little effect. Those damn gunners are having a hard time - must be too many targets to choose from! This HQ also blunders and suffers -1 to his CV next turn.
On the Soviet left flank, the T-64s and BMPs manage to advance through the smoke, although this does limit their freedom of action, so was a worthwhile tactic to employ by the British player. One T-64 platoon is suppressed by opp fire from the Chieftains, then is forced to fall-back as a result of Swingfire missiles. The T-64s suppress the BMP platoon immediately behind them as they attempt to get out of the way! The T-64s are now within main gun range of the Chieftains. Although some of them are equipped with Songster ATGW, they haven't had much opportunity to use them yet (plus the Soviet player forgot about them, which doesn't help!).

British Turn 3
Initiative fire from the CGs in the flats suppresses the lead T-10 platoon on the road and knocks out a BMP platoon and it's occupants. These Brit regulars are becoming a real nuisance to the Soviets. The recce units get their act together and give one HQ and the CO +1 to their CVs for the duration of the turn.
The Abbots successfully lay another smoke screen, this time splitting the Soviet tanks into two rows, blocking the second row of tanks, but leaving the front rank in full view of the Chieftains and Swingfire.
The regulars in the church knock-out a T-64 platoon and suppress a BMP platoon. The Milan moves to the trees to get line-of-fire to the passing T-64s.
On the British left flank, the T-64s come under fire from the Chieftains Swingfire - three T-64 platoons are knocked-out. Opp fire from the T-64s suppresses one of the Chieftain troops.
The British CO fails to issue any orders, despite having an increased CV this turn! As the Chieftains had already carried out opp fire last turn, they were on a -1 to the command roll to start with.
Casualties
The Soviets are 16/28 away from their breakpoint, the British are still 1/13 away from theirs.
Soviet Turn 4
Soviet infantry fire at the Brits in the flats, to little effect. SU-17s arrive on request and suppress a Chieftain troop on the left in the open. This is followed by a second wave of SU-17s who come under fire from SAMs, but still manage to suppress another Chieftain troop in the same vicinity.
The Soviet turn passed quickly as one HQ and the CO failed to issue any orders! However, the HQ in the centre decided on a change of plan and ordered the T-10s and BMPs off the road and round the right flank, past the church. A wise move as you will soon see...
British Turn 4
The stranded T-10 platoon on the road (suppressed last turn, so couldn't follow the others round to the right) suppressed and forced to fall-back by CG fire from the flats. The remaining Brit platoon in the flats suppressed the dismounted Soviets to their front. A BMP platoon was knocked-out by the regulars in the church.
The Abbots succeeded in laying a third smoke screen, over the second rank of T-64s like they did last turn.
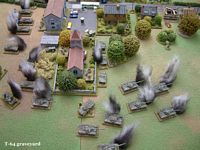
Lots more damage to the Soviets this turn: the Chieftain troop finished off the T-10 platoon on the road; the CGs in the church knocked-out a T-64 unit nearby; three T-64s were knocked-out by the Chieftains in the rough ground; Swingfire ATGWs and Chieftains on the other flank knocked-out a T-64 platoon there. Saggers from a BMP platoon opp fired against the Swingfire unit, suppressing it. T-64s also opp fired against the Chieftains, but this had no effect.
Finally, the CO issued orders to the Lynx attack helicopters and these engaged and destroyed one T-64 platoon and suppressed a BMP platoon.
Casualties
The Soviets are 23/28 away from their breakpoint, the British are still 1/13 away from theirs. The battle appears to be very one-sided at this stage in the game...
Soviet Turn 5
SU-17s attempt to engage the Chieftains and Swingfire in the open, but abort due to intense SAM fire. Over on the right flank, the T-64s have ground to a halt, with most of their number suppressed or knocked-out.
On the left flank, T-64s successfully engage and suppress the Chieftain troop on the far left. This is followed by a T-64 platoon being knocked-out by the combined opp fire of Chieftain shells and Swingfire missiles. The second wave of T-64s advance through the smoke and finally dispense with one of the Chieftain troops - the one that was suppressed!
This turn, the Soviet 62nd Guards Tank Regiment arrives and is deployed on the Soviet left flank. This time, the smoke will work in favour of the Soviets!
British Turn 5
There is further small-scale fighting infront of the flats, with one BMP becoming knocked-out. The Milan ATGW knocks out a T-64 platoon behind the church. All three recce units successfully communicate info about the enemy to their respective command units.
The Abbots lay more smoke over the advancing Soviets. An exchange of fire between Chieftains and T-64s in the open leaves two of each suppressed.
Casualties
The Soviets are 24/28 away from their breakpoint, the British are now 2/13 away from theirs.
Soviet Turn 6
SU-17s again attempt to engage the Chieftains in the open, but abort due to SAM fire. The BMPs that moved from the road advance on the church, with some of the infantry dismounting. T-10s move in support. The recently arrived 62nd Guards moves forward. The T-64s from the other regiment move forward, with two becoming suppressed from opp fire.
British Turn 6
More skirmishing around the flats, with one Soviet infantry platoon becoming knocked-out. Milan fire is ineffective against the T-64s this time round. On the British right, only one T-64 unit is suppressed. Soviet opp fire: Songster ATGW missiles from a platoon of T-64s knocks-out the Swingfires at long last! Further T-64s knock-out a second Chieftain troop, reducing the squadron to 50% strength, less it's ATGW support. A third Chieftain troop is suppressed by T-64s, then is forced to fall-back when under attack from Sagger ATGW missiles from a BMP platoon.
The British FAO failed to request the Abbots at this crucial stage in the battle!
Casualties
The Soviets are 25/28 away from their breakpoint, the British are 4/13 away from theirs.

Soviet Turn 7
The Soviets finally managed to suppress one of the British regular platoons in the flats. Both FACs failed to call in the SU-17s this turn. The HQ on the Soviet right did nothing useful.
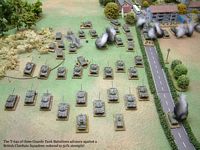
Now this is something you don't often see, but the Soviet player elected to play the CO before the HQ of the 62nd Guards. This is risky as when the CO fails to iussue an order, the turn ends. However, this can tactic pay-off when used wisely. Combined fire from T-64s and Saggers knocked-out the remaining two Chieftain troops. This was done with a lot of skill as the British player didn't get to use opp fire. Those of you who think the game is more luck than skill take note!
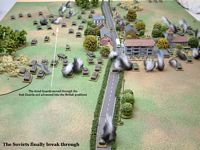
Onto the second skilfull action by the Soviet player this turn. The CO successfully issued one order, but play then switched to the HQ of the 62nd. With three orders in succession, the tanks of the 62nd thundered forward, passed through the tanks of the 61st and on towards the British lines. The British CO was overrun, but managed to reach the nearest FV.432 unit near the woods. The only fire the regiment took was from the WOMBAT in the woods and the Chieftain troop across the road - two suppressed T-64 platoons as a result.
British Turn 7
Initiative actions led to the remaining Soviet infantry platoon becoming knocked-out infront of the flats. The Milan failed to do anything to the T-64s. One of the Scorpion troops decided to depart from it's location and moved onto the road. The Chieftain troop near the road suppressed the nearest T-64 unit. The FAO had no decent targets and there was now no point in using smoke - the battle was over! There was now nothing the British could do to recover from such a mass of Soviet armour, even if the Lynx' were brought into action again. The British player conceded defeat, pulling the remaining Chieftain squadron out and hoping that the remaining troops would make it back to NATO lines.
Casualties
The Soviets ended the battle 26/28 away from their breakpoint, the British were 6/13 away from theirs.
After The Battle
The British would most likely have lost the troops in and around the church, either by surrender or through force. The troops in the woods on the other flank could have slipped away. The recce Scorpion on the road could also have slipped away. The Soviets, on the other hand, lost around a battalion of T-64s, which were the best tanks in their inventory at the time. So no easy victory, but they were through and into the countryside to the north of Hannover. One small step on their way to the conquest of Western Europe in the mid-1970s. Thank goodness it didn't happen as I was on holiday in West Germany at around this time with my parents. We were visiting an uncle who was a Sergeant in the British Army at the time (REME)!
Miniatures
All miniatures and terrain from my own collection. They are N scale, which is roughly 10-12mm scale. Models by Miniature Figurines and P.G. Models. Buildings by TimeCast, although a couple are from N scale railway manufacturers. Roads by Faller. Trees by K&M Trees and Gaugemaster. Hills by S&A Scenics.
For background information to this battle and a list of the forces involved, please purchase Issue 5 of the Wargames Journal.