Coalition Breakthrough Attack, 2nd Gulf War, Iraq, 2003
This is the first battle report to feature the new Cold War Commander rule system, which as you may know, is based on Blitzkrieg Commander. This first battle sees the Coalition forces stage a breakthrough attack against the Iraqis. The latter have occupied positions along a ridge line in the desert to the south of Baghdad in April 2003. Two-thirds of the Coalition is composed of US troops, the remaining one-third, British troops. These are split into two battlegroups.
The Battlefield
The battlefield consists of desert, desert and more desert! However, there is a ridge running across the centre of the table (played lengthways). The Iraqis deploy up to this ridge line.
Iraqi Order of Battle
The Iraqi battlegroup is composed of three formations, with a reserve off-table:
| |
Left Flank |
| |
|
CO (Command Value 8) |
| |
|
3 x Infantry Units (Regulars) + RPG-7 upgrade |
| |
|
3 x IFV Units (BMP-1) |
| |
|
1 x Tank Unit (T-72) |
| |
|
2 x Tank Units (T-54/55) |
| |
|
1 x ATGW Unit (AT-5 Spandrel, BRDM) |
| |
| |
Centre |
| |
|
HQ (Command Value 7) |
| |
|
3 x Infantry Units (Militia) + RPG-7 upgrade |
| |
|
3 x Tank Units (T-54/55) |
| |
| |
Right Flank |
| |
|
HQ (Command Value 7) |
| |
|
3 x Infantry Units (Militia) + RPG-7 upgrade |
| |
|
3 x IFV Units (BMP-1) |
| |
|
1 x Tank Unit (T-72) |
| |
|
2 x Tank Units (T-54/55) |
| |
| |
Support |
| |
|
1 x FAO (Command Value 6) |
| |
|
3 x Artillery Units (122mm) off-table |
| |
| |
Reserve |
| |
|
3 x Infantry Units (Militia) + RPG-7 upgrade |
| |
|
3 x IFV Units (BMP-1) |
| |
|
1 x Tank Unit (T-72) |
| |
|
2 x Tank Units (T-54/55) |
| |
| |
Field Defences |
| |
|
22 x Trenches (1 for each dug-in unit) |
| |
|
16 x Wire Sections |
| |
|
4 x Marked Minefields |
This works out to 2900 points. The Iraqi player will deduct 100 points from the Victory Points awarded to the Coalition at the end of the game as the points available to the Iraqi forces was 3000. The breakpoint of the Iraqi battlegroup is 20, which is 2 more units than usual. The Iraqi Army is based around Rigid Tactical Doctrine, a new concept in the game, so gains +1 unit to the breakpoint per 1000 points.
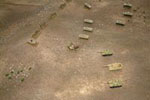
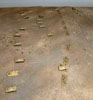
Iraqi Deployment
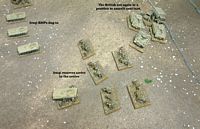
The Iraqi infantry are deployed along the ridge, with the tanks and IFVs to their rear. The Iraqis are at a major disadvantage when it comes to the ranges of tank guns. To counter this, the Iraqi tanks have been deployed behind, and within half range of, the ridge line. The wire and minefields will channel the Coalition to the flanks, whereby the Iraqi tanks can use their combined fire at close range as each Coalition unit comes into view. All on-table Iraqi units are dug-in, with each unit requiring one trench to dig-in (a minor change from Blitzkrieg Commander).
Reserves work slightly differently to Blitzkrieg Commander. In Cold War Commander, players can keep up to three units per 1000 points of their battlegroup off-table in the reserve pool. During the game, the CO can issue an order to three reserve units at a time and deploy them on the table, within 20cm of either the CO or an HQ. This gives players some flexibility and is useful in the case of the Iraqis as it gives them a mobile reserve. One of the special rules for the Iraqi Army is that all tanks must be dug-in when in defence, ie: they are in a static role.
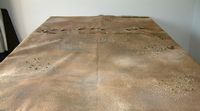
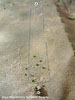
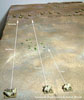
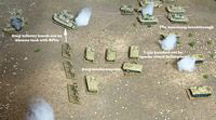
Iraqi Scheduled Artillery
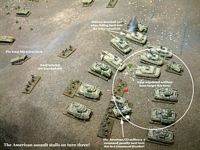
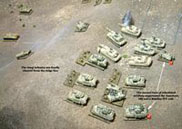
The minefield covers the centre of the ridge line, leaving a gap at either end through which it is hoped the Coalition forces will pass. Both of these points are registered as artillery targets. Two batteries of 122mm guns are scheduled to fire concentration on turns 3 & 4 at target 'A', and one battery during the same turns at target 'B' (see third pic below). The unit in the picture under point 'B' is the Iraqi FAO - he will obviously be moving prior to turn 3!
The Coalition is composed of two battlegroups - one US and one British. This is loosely based on the joint US and British drive north towards Baghdad in May 2003. Whilst they probably never fought together, it makes for an interesting game!
US Order of Battle
The US battlegroup is composed of two formations as follows:
| |
Command |
| |
|
CO (Command Value 10) |
| |
|
6 x IFV Units (M2 Bradley) |
| |
|
6 x Infantry Units (Regulars) + M136 AT4 upgrade |
| |
|
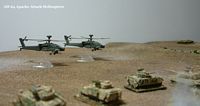
2 x Attack Helicopter Units (AH-64D Apache) available on request |
| |
| |
Armor |
| |
|
HQ (Command Value 9) |
| |
|
6 x Tank Unit (M1 Abrams, 120mm, Heavy Armor) |
| |
| |
Artillery Support |
| |
|
FAO (Command Value 8) |
| |
|
2 x Artillery Units (155mm, M109) |
| |
|
1 x Artillery Unit (RL, MLRS) |
This works out to 3935 points and a breakpoint of just 6 (-1 unit per 1000 points as the American Army is based on Flexible Tactical Doctrine). However, those M1 Abrams Heavy Armor are some of the toughest units in the game and cost just over 1500 points for six of 'em! Note that the Apaches are under the command of the CO, not under the command of an FAO. They can also be requested by any HQ, they are not tied to the CO.
British Order of Battle
The British battlegroup is also composed of two formations as follows:
| |
Armour |
| |
|
CO (Command Value 10) |
| |
|
4 x Tank Units (Challenger II) |
| |
|
1 x Artillery Unit (155mm, AS-90) on-table |
| |
| |
Mechanised Infantry |
| |
|
HQ (Command Value 9) |
| |
|
4 x IFV Units (Warrior + TOW) |
| |
|
4 x Infantry Units (Regulars) + LAW-80 upgrade |
This works out to 1980 points and a breakpoint of 5 (again, -1 unit per 1000 points as the British Army is also based around Flexible Tactical Doctrine). As you can see, the British battlegroup is slightly smaller than that of the US and will likely be given a support role during the battle.


Coalition Deployment
The Americans deploy on the left flank using Mobile Deployment, whilst the British deploy on the right flank using Flank Deployment. As a scenario-specific rule, the British are allowed to deploy their entire battlegroup on the flank, under the command of the CO. The HQ will move onto the table at the end of turn one to take command of the tanks.
No units will attempt to breach the minefield as the Coalition player felt this was an unnecessary risk and would slow the advance down.
Coalition Plan
The Americans will make the breakthrough as they have the largest battlegroup. The British will assault the Iraqi line and destroy as much of the Iraqi battlegroup as possible, drawing the reserves away from the American advance. Although the British don't have any artillery or air support, they are able to request the American artillery as and when required.
Coalition Turn 1
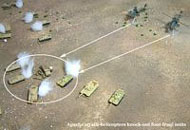
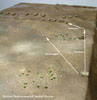
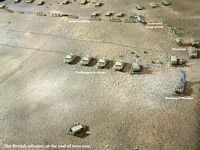
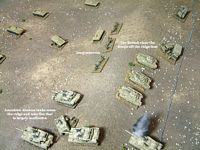
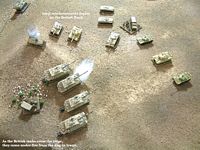
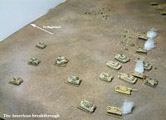
The British take the first command roll and deploy on the right flank. The leading Warrior immediately comes under fire from the Iraqi ATGW mounted on the BRDM and is destroyed, including the passengers. First blood to the Iraqis, but the ATGW has given away its position. On the second order, the Challengers take advantage of their fire-on-the-move capability and knock-out the ATGW at the end of their move. The Warriors move to the gap in the minefield and overrun the Iraqi FAO. The British turn ends with the Challengers and AS-90 at the wire, with the Warriors pushing ahead through the gap in the minefield (see pic below left).
The Americans move forward towards the left-hand gap in the minefield (see pic below right).
Iraqi Turn 1
The Iraqi player elects to do nothing this turn.
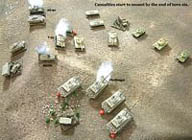
Casualties
The Americans are 0/6 away from their breakpoint and the British are 2/5 from theirs. The Iraqis are 1/20 away from their breakpoint, but have also lost their FAO.

Coalition Turn 2
The British dismount from the Warriors behind the safety of the ridge. The leading infantry unit comes under fire from the Iraqi infantry and is suppressed.
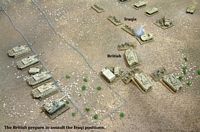
The Americans push forward to the gap in the minefield. The infantry dismount from the first wave of Bradleys in preparation to assault the Iraqis (those RPGs are nasty, so dismounting from the IFVs makes the infantry less vulnerable to Iraqi attack). An Abrams comes under fire from Iraqi RPGs on the right.
Iraqi Turn 2
The Iraqis on the ridge fire RPGs at the nearest Abrams and suppress it. The Iraqi CO attempts to bring on reserves, but blunders - to no effect.
Casualties
The Americans are 0/6 away from their breakpoint and the British are 2/5 from theirs. The Iraqis are 1/20 away from their breakpoint.

Coalition Turn 3
During the initiative phase, the British Challengers suppress the Iraqi infantry who opened fire last turn. The British infantry and Warriors move forward, but one infantry unit is suppressed by Iraqi fire. The Americans open fire at the Iraqi infantry and suppress one unit. The Bradleys and infantry nearest the ridge move forward in preparation to assault the Iraqi infantry.
The American FAO requests the M109s against the ridge line, but the fire falls over and to the left, hitting the Iraqi HQ and an infantry unit on the ridge. The FAO then successfully requests one MLRS battery, but this falls short and to the left. One Iraqi infantry unit is knocked-out, another is suppressed. Unfortunately the MLRS battery also catches four Abrams, forcing the one that is suppressed to fall-back into the minefield, knocking it out!
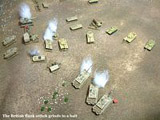
Both the American HQ and the CO fail to issue any orders this turn, so the advance grinds to a halt.
Over in the British sector, the infantry and Warriors assault the Iraqis on the ridge, but the British lose one infantry unit. The Challengers offer their support and knock-out two infantry units on the ridge. The infantry and Warriors advance down the line, with the lead Warrior coming under fire from RPGs, to no effect.
Iraqi Turn 3
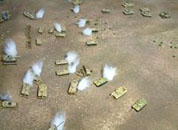
The scheduled artillery arrives at the beginning of the Iraqi turn, catching the Americans on the left. One infantry unit is suppressed, one Abrams is hit to no effect, as is one of the Bradleys. The British are nowhere near the artillery on the right, so the desert is given a right old pummelling! The Iraqi CO again fails to bring on the reserves.
Casualties
The Americans are 1/6 away from their breakpoint and the British are 3/5 from theirs. The Iraqis are 4/20 away from their breakpoint.

Coalition Turn 4
British infantry supported by Warriors assault the Iraqi infantry on the ridge, but both the British and the Iraqi infantry are knocked-out! Lesson Number 1: Dismounted assaults are dangerous - stay in your IFV! The Americans attempt a similar move, but fail to suppress the Iraqis, so no assault there.
The American FAO again requests the M109s and is successful. These hit and suppress two Iraqi infantry units. The HQ again fails to issue any orders. The CO orders the infantry and the Bradleys - one Iraqi infantry unit is knocked-out by the Bradleys, whilst another infantry unit is assaulted and knocked-out by two American units. The CO then rolls a blunder, but is unaffected.
Back to the Brits and the HQ blunders, forcing the tanks to pull-back (must be the threat of those RPGs!). The Warriors advance, one taking hits from RPGs. The dismounts climb aboard the Warriors, then the Warriors assault an Iraqi infantry unit, knocking it out. The Iraqi line is starting to thin out.
Iraqi Turn 4
The second turn of scheduled artillery suppresses the American HQ and one Bradley unit. The Iraqi CO finally manages to bring on some reserves in the shape of three infantry units. These are deployed in the centre of the Iraqi line, behind the ridge.
Casualties
The Americans are 1/6 away from their breakpoint and the British are 4/5 from theirs. The Iraqis are 8/20 away from their breakpoint. It's not looking good for the British, but they are certainly fulfilling their orders in destroying the Iraqi line.
Coalition Turn 5
British troops suppress two Iraqi infantry units during the initiative phase.
The American FAO fails to request artillery support this turn. The American HQ is suppressed, so cannot do anything this turn. The American CO orders the infantry to mount the Bradleys and the Abrams cross the ridge. The first one takes fire from Iraqi T-55s and T-72s, becoming suppressed. The second one that crosses is hit by T-55s to the front and RPGs in the flank, but is OK. The Iraqi HQ on the left is overrun. The Abrams open fire once they are on the ridge and knock-out one T-55 unit, then suppress another T-55 unit and a T-72 unit.
The British Challengers reach the ridge on the far left, but come under intense Iraqi fire, with one Challenger becoming suppressed. The Warriors have more success as they assault and knock-out the remaining two Iraqi infantry units on the ridge.
Iraqi Turn 5
The HQ in the centre moves one BMP unit to support the three reserve infantry units. The CO receives more reserves, this time one T-72 and two T-55 units. These are deployed under his own command on the Iraqi right, facing the British. A second Challenger is suppressed by the combined-fire of the dug-in T-55s and T-72. This turns into a knock-out when the next salvo hits and does serious damage to the Challenger unit.
Casualties
The Americans are still only 1/6 away from their breakpoint, but the British have reached theirs on 5/5. The Iraqis are 11/20 away from their breakpoint. Those Iraqi reserves deployed at just the right time to contain the British tanks. Not good news for the British commander as he has to rally his troops at the start of the next turn in order to continue the fight...
Coalition Turn 6
The British commander first has to make a command roll in order for his troops to stay in the battle. It is a straight command roll needing 10 or less and he makes it!
The Americans knock-out a T-55 unit during the initiative phase. The M109s hit an Iraqi HQ and a T-55 unit in the centre, to no effect. The American HQ blunders yet again - what is wrong with this guy and his staff? American troops are caught in cross-fire, but fortunately to little effect. The American CO also fails to issue any orders. The Americans have again ground to a halt - maybe it's the lovely scenery that's distracting them!
The British are having a hard time of it too this turn, with the three Challengers opening fire at the Iraqi tanks, to little effect. However, this attracts some serious response fire and two Challengers are suppressed on the ridge - not the best place in the world to be!
The Warriors pull-back and move across to support the right flank. One Warrior and the AS-90 are suppressed by BMPs. T-55s also open fire at the AS-90, but miss their target. Two Warriors assault one of the reserve T-55 units in the flank, knocking it out in the second round (that'll teach 'em!). They then assault the reserve T-72 in the flank, but beat a hasty retreat back up the ridge.
Iraqi Turn 6
The British AS-90 unit is knocked-out by BMPs during the initiative phase. A Warrior unit is suppressed by more BMPs. All three Challengers are suppressed by the combined-fire of the Iraqi tanks. The British are in a serious position now. Over in the American sector, an Abrams unit is suppressed by fire from T-55s and RPGs.
Casualties
The Americans are 1/6 away from their breakpoint and the British are 6/5 beyond theirs. The Iraqis are 13/20 away from their breakpoint.
Coalition Turn 7
The British CO again has to make a command roll to remain in the battle, but this time his command value is reduced by one for being one unit over the breakpoint of 5. Rolling two dice, he succeeds.
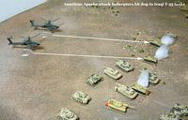
American initiative fire is ineffective. The FAO requests the M109s and suppresses a T-55 in the centre. Unfortunately the American CO is also hit, but survives. The Abrams and Bradleys continue the advance into the Iraqi rear and on towards Baghdad. The CO now brings the two Apache attack-helicopters into action, and these knock-out a T-55 each. Easy targets for these guys!
The Brits pull-back as many units as they can - all two of 'em! The rest are suppressed.
Iraqi Turn 7
BMPs hit the Warrior nearest to them, forcing the infantry to dismount. This is player choice, but as the Warrior only needs one more hit before it is knocked-out, it makes sense to dismount the infantry. One Challenger unit is hit by T-55s and T-72s. First it is suppressed, then falls-back 11cm - knock-out!
The Americans also suffer this turn as the lone Abrams unit on the ridge is hit in the flank by RPGs and knocked-out. The Iraqi CO brings the final three reserve units (BMPs) into action. These are placed in the centre, behind the three reserve infantry units. The Warrior unit that was hit and suppressed earlier in the turn is knocked-out by the BMPs. The infantry fall-back.
Casualties
The Americans are 2/6 away from their breakpoint and the British are 8/5 from theirs. The Iraqis are 15/20 away from their breakpoint.
Coalition Turn 8
The British CO now needs to roll seven or less on two dice to stay on the battlefield! Surprisingly, he succeeds, but the British player elects to withdraw his troops anyway as they have fulfilled their mission of destroying the Iraqi troops on the ridge line.
The Abrams continue to advance towards the table edge as the Bradleys reach their objective in exiting the table. The FAO scores the one and only command bonus in the game! The M109s hit and knock-out one BMP unit and suppress some infantry. The Apaches return to the field and destroy two T-55s with their ATGW, and two BMPs with their cannons.
Iraqi Turn 8
The Iraqis concede the game as the British have withdrawn and the Americans will exit the Abrams off the table next turn. The battle is over!
Casualties
The Americans have lost two units, the British have lost eight and the Iraqis have lost twenty, reaching their breakpoint on the last turn of the game. A Breakthrough Attack can be as long as 12 turns if need be.