Japanese Advance vs Russians, Manchuria, July 1939
Off we go to sunny Manchuria for this battle report! It's July 1939 and the Japanese are about to launch a limited offensive against Russian positions on the east bank of the Halha River (Khalkin Gol), south west of Nomonhan. The action detailed in this report sees elements of Task Force Yasuoka advance against the Russian positions hidden amongst the sand dunes. The advance was meant to begin on the morning of the 3rd July, but the Japanese commander was under the (mistaken) impression that the Russians were withdrawing, so decided to begin the advance at 18:00 hours the evening before in the hopes of catching the Russians in retreat.
The Battlefield
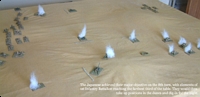
Below is a picture of the battlefield, played down the length of a table approximately 120cm by 160cm. It's as sparse as they come, the entire area comprised of sand dunes and not much else! All I've done is dye a sheet sandy-brown, then draped this over my regular table and placed three hills underneath, just to break it up a bit. There wasn't much in the way of cover and the area was quite muddy due to the heavy thunderstorms that took place at the time.

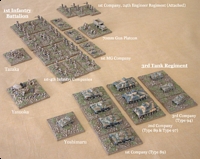
Japanese Order of Battle
The Japanese battlegroup comprises of the following units, split into five separate formations.
| |
Task Force Command |
| |
|
CO, Yasuoka (CV9) |
| |
| |
1st Infantry Battalion, 64th Infantry Regiment, 23rd Infantry Division |
| |
|
HQ, Tazaka (CV8, BP10) |
| |
|
12 x Infantry Platoons |
| |
|
3 x Support Platoons (MG) |
| |
|
1 x Support Platoon (IG, 70mm) & Truck |
| |
|
1 x ATG Platoon (37mm) & Truck |
| |
|
3 x Engineer Platoons (1st Company, 24th Engineer Regiment) |
| |
| |
2nd Infantry Battalion, 64th Infantry Regiment, 23rd Infantry Division |
| |
|
HQ, Tokumaru (CV8, BP9) |
| |
|
12 x Infantry Platoons |
| |
|
3 x Support Platoons (MG) |
| |
|
3 x Engineer Platoons (2nd Company, 24th Engineer Regiment) |
| |
| |
3rd Tank Regiment, 1st Tank Corps |
| |
|
HQ, Yoshimaru (CV8, BP6) |
| |
|
1st Tank Company, 4 Medium Tank Platoons (Type 89) |
| |
|
2nd Tank Company, 4 Medium Tank Platoons (3 x Type 89, 1 x Type 97) |
| |
|
3rd Tank Company, 3 Light Tank Platoons (3 x Type 94) |
| |
| |
13th Field Artillery Regiment |
| |
|
FAO (CV6) |
| |
|
2nd Artillery Battalion, 1 Artillery Battery (105mm) |
As it's a historical scenario, points and battlegroup limits are ignored. There are some scenario-specific rules for the Japanese:
- Infantry and armour cannot be issued orders together as a single formation
- Due to poor ground conditions, trucks only move 10cm
- Yasuoka (the CO) cannot issue orders to any units
- A command unit will get +1 to its CV if Yasuoka is within 20cm
- The task force has three separate breakpoints due to poor visibility and communications
- When testing for breakpoints, use the command value of the HQ controlling that formation
- You may use the command value of Yasuoka when testing for breakpoints provided he is within 20cm of the HQ
- Armour suffers a -1 command penalty when attempting to cross wire
I left out the 2nd Infantry Battalion from the game as I didn't have enough figures. I also had to use substitutes for most of the tanks - not that you'll notice ;-)
Russian Order of Battle
Due to the circumstances affecting the battle, the Russian forces are selected on a random basis during the game. The Russian forces can be played solo or by another player. The following scenario-specific rules apply:
- All units are dug-in and are hit on sixes
- All units except tanks have wire 5cm to their front
- No units may charge the enemy and units under charge will open fire
Deployment
The Japanese will enter the table using mobile deployment with the HQs being placed at least 30cm apart. The Russians are handled differently in this scenario to reflect the lack of Japanese intelligence before the battle, as well as the poor visibility that characterised the evening, which was bloody awful - thunderstorms followed by more thunderstorms! As a result, the Russian forces will be deployed on a random basis during the game.
'Advance' Scenario
This is a new scenario not detailed in the book. The attacker has 50% more points available than the defender and may purchase assets for artillery and air support. The defender deploys first, with half his battlegroup in the centre third of the table and the other half in the third next to his baseline. He may purchase assets for artillery and air support, and may purchase field defences for hasty defence. The attacker should deploy opposite the defender using mobile deployment, but may not use the flank deployment rule.
The attacker will gain a minor victory if he occupies the centre third of the table and a major victory if he occupies the third of the table nearest the defender. To occupy a section of the table, just treat the entire section as a terrain objective. The defender will gain a minor victory if he denies the attacker the third of the table nearest his baseline and a major victory if he denies the attacker the centre third of the table. The game is limited to 10 turns, with the attacker taking the first turn.
Russian Forces
To account for poor weather and lack of intelligence, the precise composition of the Russian battlegroup isn't known before the game. The Japanese thought they were facing motorised infantry, but that was about all they knew. To determine what forces the Japanese encounter during their advance, the Japanese player should roll one d6 for each of his three formations at the end of each of his turns and adjust the score for any of the modifiers that apply. The three formations are the 1st and 2nd Infantry Battalions, plus the 3rd Tank Regiment. Note that in this report, I only use two formations - the 1st Infantry Battalion and the 3rd Tank Regiment.
| Modifiers |
| |
+1 |
per full 20cm distance covered this turn (excluding command units) |
| |
+1 |
if any troops have reached the centre third of the table |
| |
+2 |
if any troops have reached the farthest third of the table |
| Result |
| |
1 or 2 |
Russian troops appear 20cm to the front of the formation |
| |
3 or 4 |
Russian troops appear 20cm on the right flank of the formation |
| |
5 or 6 |
Russian troops appear 20cm on the left flank of the formation |
| |
7 or more |
Russian troops appear 20cm to the rear of the formation |
If units don't have enough room to deploy, either move them slightly, ensuring they are still within 20cm of the Japanese, or re-take the above test. Once done, roll one d6 to see what Russian troops appear:
| Modifiers |
| |
+1 |
the Russians are deployed in the centre third of the table |
| |
+2 |
the Russians are deployed in the farthest third of the table |
| Result |
| |
1 |
Three medium artillery batteries firing concentration* |
| |
2 |
Two heavy artillery batteries firing concentration* |
| |
3 |
Nothing! |
| |
4 |
Infantry company comprising of 3 Infantry Platoons and 1 MG Platoon |
| |
5 |
37mm ATG Platoon |
| |
6 |
BT Light Tank Platoon |
| |
7 |
Medium artillery battery deployed on-table |
| |
8 |
Heavy artillery battery deployed on-table |
* The artillery will target the Japanese unit belonging to the formation that is nearest the Russian baseline. Units that are further than 30cm from the command do not count. Roll for deviation the first time round, then continue firing at the same hit-point each turn until there are no Japanese units in the zone.
Russian Unit Deployment
When deploying Russian units on the table, position the first unit the required distance away from the nearest Japanese unit, facing directly towards it. Place any remaining units 5cm apart adjacent to the first, alternating between the flanks of the unit starting on the left. Units operate as formations according to their deployment, so a Russian infantry company will count as a single formation, a BT platoon will count as a single formation, and so on.
All units except tanks have 20cm lengths of wire 5cm to their front. This causes a -1 command penalty to Japanese armour when attempting to cross. Historically, the wire got caught in the tracks of Japanese tanks, causing lengthy delays, even immobilising some of the tanks.
Russian Actions
The Russians can be controlled by another player, or you can leave it to the dice and play solo! The following rules apply to the Russians:
- All Russian troops are dug-in and will be hit on sixes
- No units may charge the enemy and units under charge will open fire
- All units will open fire using their initiative where possible
- Units will open fire at the nearest enemy unit within range
- Tanks/ATG will fire at armour, then ATG, then infantry
- Infantry will fire at infantry, then ATG, then armour
- Issue orders to units one formation at a time using the HQ command value
- Units in the table section nearest the Russian baseline use the CV of the CO
- Ignore the command penalty for distance from the command
- When a formation fails it's command roll, continue with the next formation
- The Russian battlegroup doesn't have a breakpoint
Special Rules
The following special rules apply to the scenario:
- Artillery will hit troops in the open on 5+ due to the soft, wet sand
- Use the optional rules for 'Weather' as detailed on page 48 of the rule book
- The game begins with poor weather
You can download the entire scenario here.
Turn 1
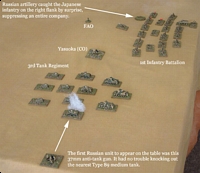
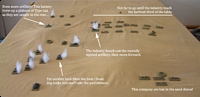
The infantry of 1st Battalion advance onto the table on the Japanese right flank. The tanks of 3rd Tank Regiment advance on the left, moving 30cm in total. At the end of the turn, both formations test to see if any Russian units appear on the table. A 37mm anti-tank gun platoon is located on the left flank of the tank regiment, and the lead elements of 1st Battalion come under heavy artillery fire. The anti-tank gun on the left opens fire at the nearest Japanese tank (Type 89), brewing it up no problem.
Casualties
The Japanese have lost one tank platoon, so the 3rd Tank Regiment is 1/6 away from its breakpoint.
Turn 2
The infantry on the right continued to advance, except the company that were under artillery fire yet again. They were doomed to spend the rest of the game buried in the sand dunes! The tanks advanced the farthest, with the speedy Type 94s reaching a slight incline. They then came under artillery fire, but this was to no effect. In the centre, a Russian on-table artillery battery suddenly appeared and opened-up on the nearest infantry platoon.
Casualties
No change from the first turn, 3rd Tank Regiment were still 1/6 away from their breakpoint.

Turn 3
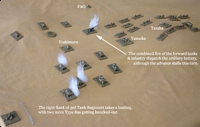
The forward tanks and infantry opened fire at the artillery battery in the centre, knocking it out. That was all the Japanese managed to do this turn, however, as the advance ground to a halt. The Russian anti-tank gun on the left managed to knock-out two Type 89 tank platoons, hitting them both in the flank.
Casualties
3rd Tank Regiment was now 3/6 away from its breakpoint.
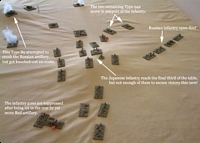
Turn 4
Both Japanese formations advanced slowly this turn. A nasty surprise lay in store for 3rd Tank Regiment as a BT platoon appeared in its rear! This opened fire and knocked-out the only decent Jap tank platoon on the table - the Type 97s. The artillery continued to fire on the stranded infantry company, keeping it pinned and out of the battle. The Russian anti-tank gun once again knocked-out another Type 89. Things weren't going well for 3rd Tank Regiment...
Casualties
3rd Tank Regiment was now 5/6 away from its breakpoint.

Turn 5
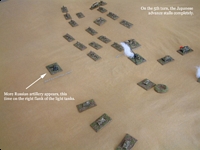
Communication failures all round, the Japanese advance completely stalled this turn. The Russian BT platoon almost knocked-out another Type 89, managing only to suppress it. Another battery of artillery appeared on the right flank of the leading Type 94 light tanks. This opened fire, but to no effect.
Casualties
No change from before, 3rd Tank Regiment was still 5/6 away from its breakpoint.
Turn 6
Japanese infantry took the recently located artillery battery under intense fire, killing the gun crews. The advance then continued with forward elements of 1st Infantry Battalion approaching the farthest third of the table. Another nasty surprise appeared in the rear of the forward Japanese tanks in the shape of yet another artillery battery. This managed to knock-out one platoon of Type 94s. The BT platoon succeeded in knocking-out the tanks it suppressed last turn. The Japanese tank formation was getting well and truly shot to pieces.
Casualties
The Japanese 3rd Tank Regiment was now 7/6 away from its breakpoint, meaning its commander, Yoshimaru, would have to motivate his troops at the start of the next turn in order for them to continue fighting.
Turn 7
The forward elements of both Japanese formations reach the farthest third of the table, with the Type 94s of Yoshimaru's regiment advancing successfully in support of the infantry. As the infantry of 1st Battalion ascend the sand dune on the right, they spot a Russian infantry company to their front, who open fire at them knocking out one platoon and suppressing another.
On the left flank, one of the Japanese tank platoons advanced towards the artillery battery that shot-up one of the Type 94 platoons last turn. Unfortunately, the Russian gunners heard the tanks approaching and after manhandling their guns 180 degrees, opened fire knocking the tanks out.
A fresh Russian artillery battery appeared behind the infantry over on the far right, then proceeded to take the infantry gun battery under direct fire, suppressing it.
Casualties
3rd Tank Regiment was 8/6 away from its breakpoint and 1st Battalion was now 1/10 away from its breakpoint.
Objectives
As the Japanese had to get one HQ and three infantry units into the farthest third of the table and remain unsuppressed until the end of the opponent player turn, it was time to check this at the end of turn 7. One HQ (Tazaka), one infantry platoon and one MG platoon were in the farthest third of the table, but the other infantry platoon that would've secured victory was suppressed. Fight on!
Turn 8
The infantry of 1st Battalion opened-fire at the Russian infantry company, then the Japanese FAO successfully called-in the battery of 105s in support, but all was to little effect as the Russians were well dug-in. The infantry bringing up the rear moved forward, with several platoons crossing to the farthest third of the table.
The Russians managed to knock-out the infantry gun platoon on the right and another BT platoon appeared on the left flank of the two remaining Type 94 platoons. Fortunately this failed to do any damage this turn. To add insult to injury, yet another artillery battery was sighted on the far right, which opened-up against the nearest infantry platoon.
The Russian infantry company fired at the Japanese infantry on the higher dunes, knocking one out and suppressing another, however, this was not enough to deny a major victory to the Japanese!
Objectives
Japanese infantry of 1st Battalion succeeded in securing the objective, winning the Japanese a major victory - subject to a final casualty count. Calculating the points for Japanese losses gave a total of 270, that of Russian losses, 90. That meant the Japanese lost three times as much during the battle, reducing their major victory to a minor victory. Nevetheless, it was still a Japanese victory!
The Actual Battle
The advance of Task Force Yasuoka went very similar to how the game panned-out, with the 3rd Tank Regiment suffering heavy casualties. The infantry of 1st and 2nd Battalions dug-in for the night on Hill 731, then after continuing the advance at first light, were forced to withdraw under heavy Russian fire.
The final outcome of the Nomonhan incident was that the Japanese lost the initative in Manchuria and decided to head south into the Pacific for their territorial expansion. This was indeed one of the pivotal campaigns of the Second World War, despite the majority of people not knowing anything about it, allowing Russia to focus her attentions against one enemy: the Germans.
Bibliography
For further information on the border clashes between the Japanese and the Russians in 1939, the following publications are pretty much all that is available: